Self-hosted Image Solution
Why use self-hosted images
Section titled “Why use self-hosted images”There are many ways to get direct image links. The most common one is an image hosting service platform. It is convenient, has mature apps, and when you give it an image, it gives you a URL. But they may review your images, may leak your images, and may remove your images without permission. The reason is that with this hosting method, you do not have greater control over your own images. By using cloud storage provided by well-known cloud providers, such as Cloudflare R2, AWS S3, and building an image hosting service yourself, you can gain full-chain control over your own images from server to client. For a VRC photo album, their free tiers are already enough for use.
Next, I will only introduce CloudFlareR2, which is also the solution I use myself.
1. Domain and R2 access methods
Section titled “1. Domain and R2 access methods”For this solution, it is best to have your own domain. The most direct benefit is that image loading becomes stable and fast, and players in some network-restricted regions may also have a chance to see your images. Of course, using the development test domain provided by R2 can also make the RemotePhotoSystem solution run successfully.
CloudFlare’s documentation about public R2 buckets explains the benefits of custom domains: https://developers.cloudflare.com/r2/buckets/public-buckets/
| Comparison item | r2.dev test domain | Custom domain |
|---|---|---|
| Purpose | Development / testing environment | Formal production environment |
| Domain | Randomly assigned garbled domain | A domain like example.com, similar to common website domains |
| Rate limit | Has a rate limit. Exceeding it may temporarily throttle requests and may return 429 Too Many Requests | This rate limit rule does not apply. A custom domain uses the quality service provided by the CloudFlare plan |
| Cache | Not supported | Supports Cloudflare Cache to accelerate access to R2 |
| CDN acceleration | Not supported | Supports CDN acceleration and global access |
| Security | Very weak and cannot be customized | Uses CloudFlare protections such as DDoS defense, abuse prevention, AI crawler control, and many other security measures |
To get a domain, you can buy one directly on CloudFlare, or buy one from another domain provider. In my case, I bought a .top domain from NameSilo for $1.88 for one year. Renewing this domain costs $4.88 per year.

After you have a domain, follow the CloudFlare add domain guide to connect your domain to CF, then let CF fully take over your domain’s DNS and configure security defense switches. Do not worry, CloudFlare will give you recommended settings.
If you run into any obstacles while buying a domain or binding the domain to CloudFlare, search for related tutorials on video websites. There are many mature tutorials for this kind of operation, or you can check the help documents of CloudFlare and the domain provider, or ask AI.
Here is a short guide for developers who are familiar with the process: https://imageport.app/en/docs/for-cloudflare-r2

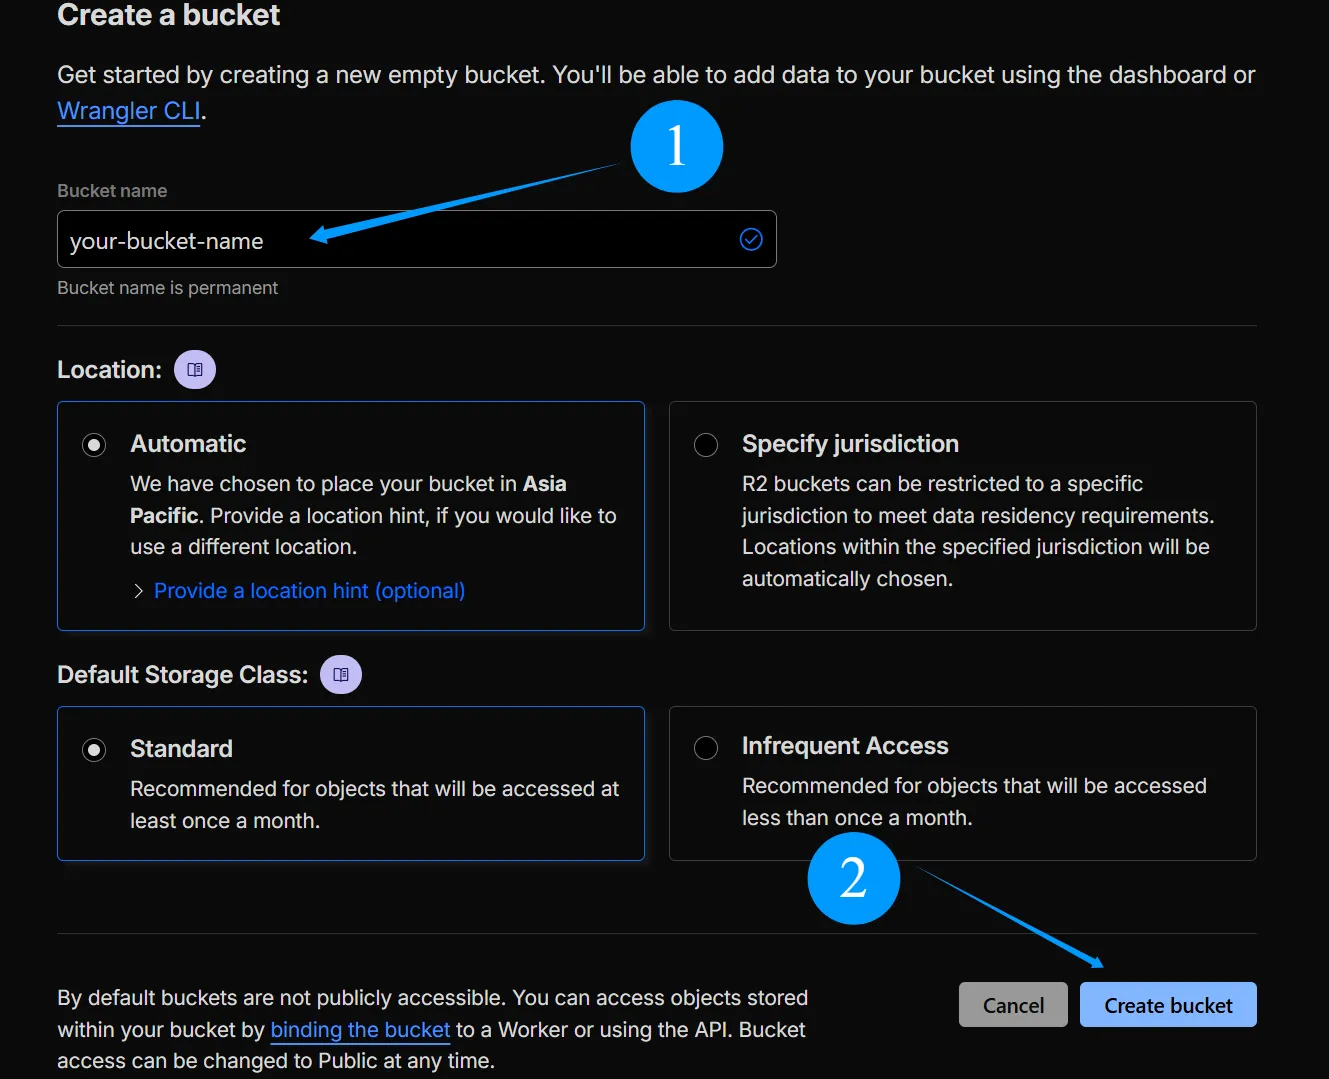
2. Create an R2 Bucket
Section titled “2. Create an R2 Bucket”Now we finally reach the R2 stage. In the CloudFlare sidebar, find R2 Object Storage and click Create Bucket
Give this bucket a name. Check whether Location is the region where the main players of your VRC world are located. If not, you can specify it manually. Make sure Default Storage Class uses Standard, then click Create bucket.

3. Bind a custom domain or enable r2.dev
Section titled “3. Bind a custom domain or enable r2.dev”Congratulations, you have created an R2 Bucket, but do not rush to upload images yet. Click Settings. If you bought and bound your own domain, click the Add button under Custom Domains and follow CF’s guide to assign a domain to this R2 Bucket. If your domain is not only intended for the VRC photo album, or if you also want to leave room for future development, assign a subdomain to R2.
- Subdomain: xxxx.your-domian.com
- Root domain: your-domian.com
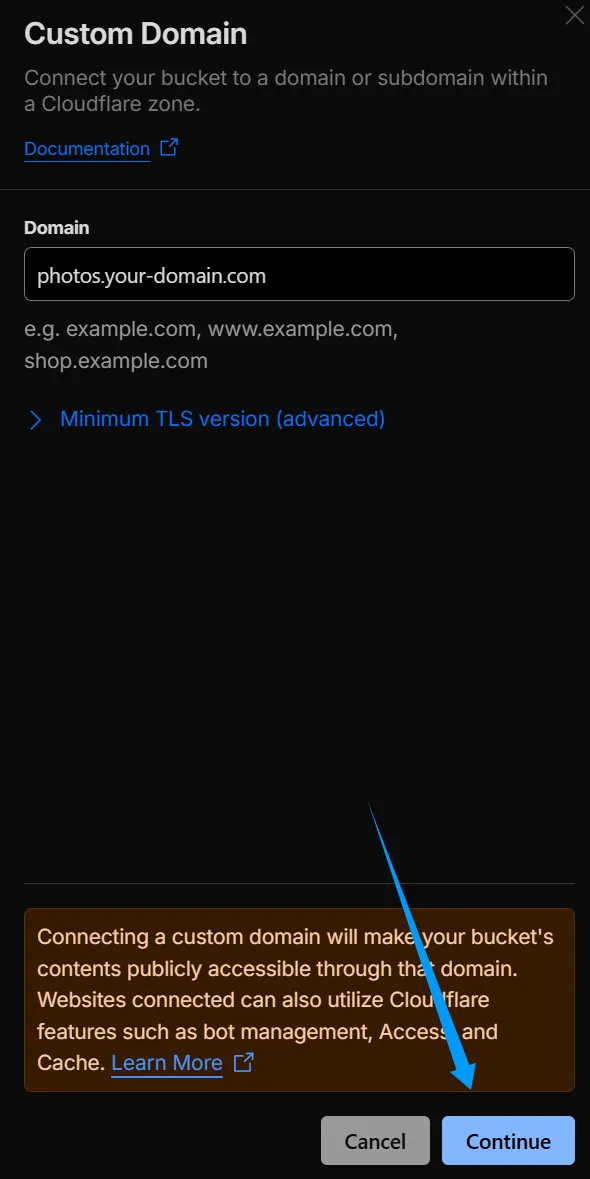
You only need to give R2 a subdomain in the Add box. As shown in the image, adding photos in front can be recognized as a subdomain. On the confirmation screen after clicking Continue, click Connect domain, wait for a while, and now you should be able to access R2 with your domain.
If you want to use R2’s development test domain first, you need to click Enable after Public Development URL. A window will pop up and ask you. Enter allow in the input box and click the Allow button. At this point, you should get a .r2.dev domain.
4. Image management solution
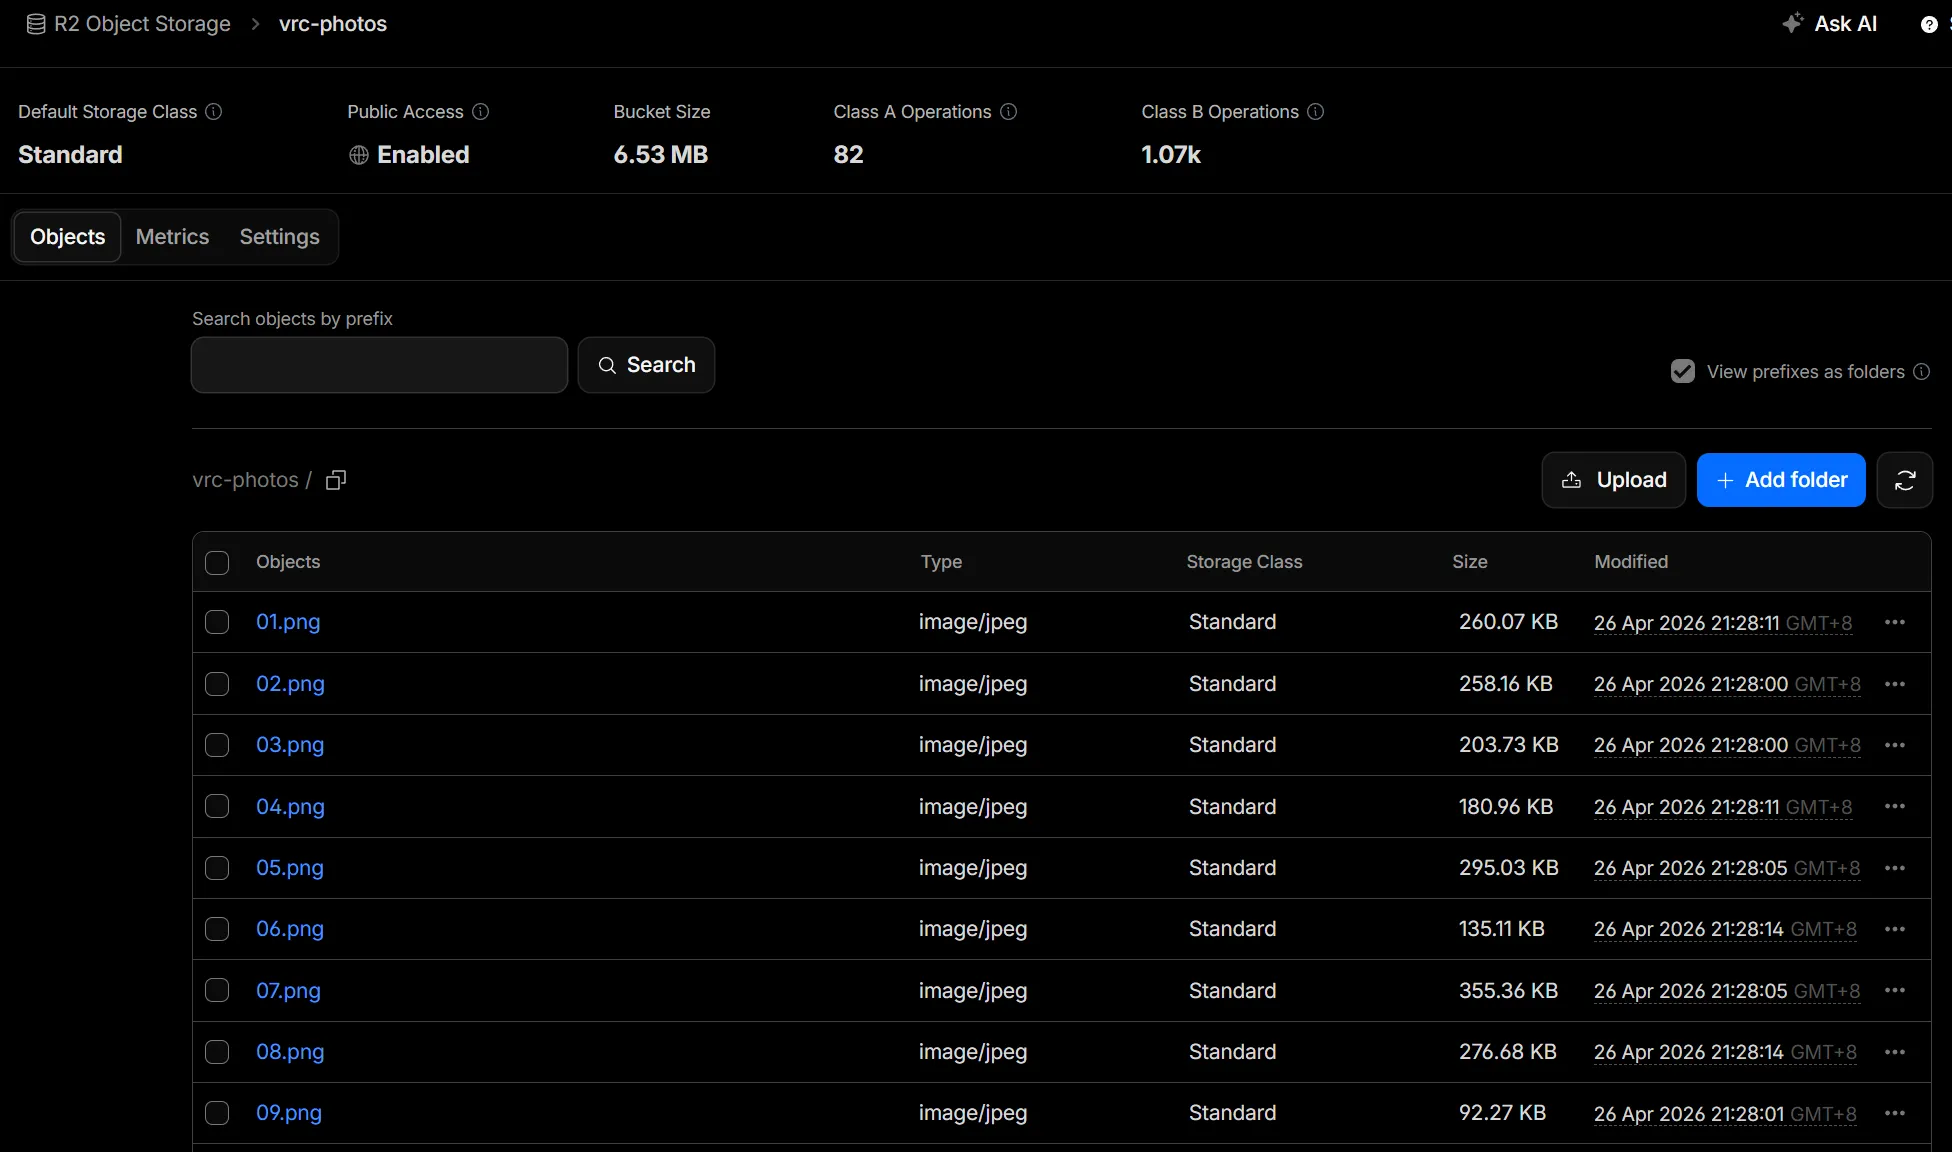
Section titled “4. Image management solution”Next is uploading images. But before uploading images, we need to know that the image management window for an R2 bucket is a pure directory structure like the image below. It lacks an image visual operation interface. For smooth image management operations, I recommend:
S3 Image Port ——A dashboard to manage your images in S3 buckets.
https://github.com/yy4382/s3-image-port
S3 Image Port can provide such an intuitive operation interface and directly connect with R2. You can upload/delete images in S3 Image Port, and it also supports compressing images before upload to save storage space and help network transmission. Also, you do not need to download any program. This is a static frontend application. Visit https://imageport.app/ and you can use it directly. Your R2 credentials will be saved in the browser locally, or you can enable encrypted sync to a remote Redis service. S3 Image Port itself does not store images, does not distribute images, and has no backend at all.
As of the completion of this document, S3 Image Port has not added the bulk copy URLs feature. To make it convenient to connect with the RPS web tool, you can consider using my branch https://github.com/thok404/s3-image-port/tree/feature/gallery-bulk-actions ==This branch does not have the config file sync feature==
Web application for direct use: https://imageport.thok.top/
You can read the concise official S3 Image Port guide: https://imageport.app/en/docs/for-cloudflare-r2
Important erratum: The API Token permission should be Admin Read & Write, not Object Read & Write.
You can also read the image-and-text tutorial below
5. Configure R2 CORS
Section titled “5. Configure R2 CORS”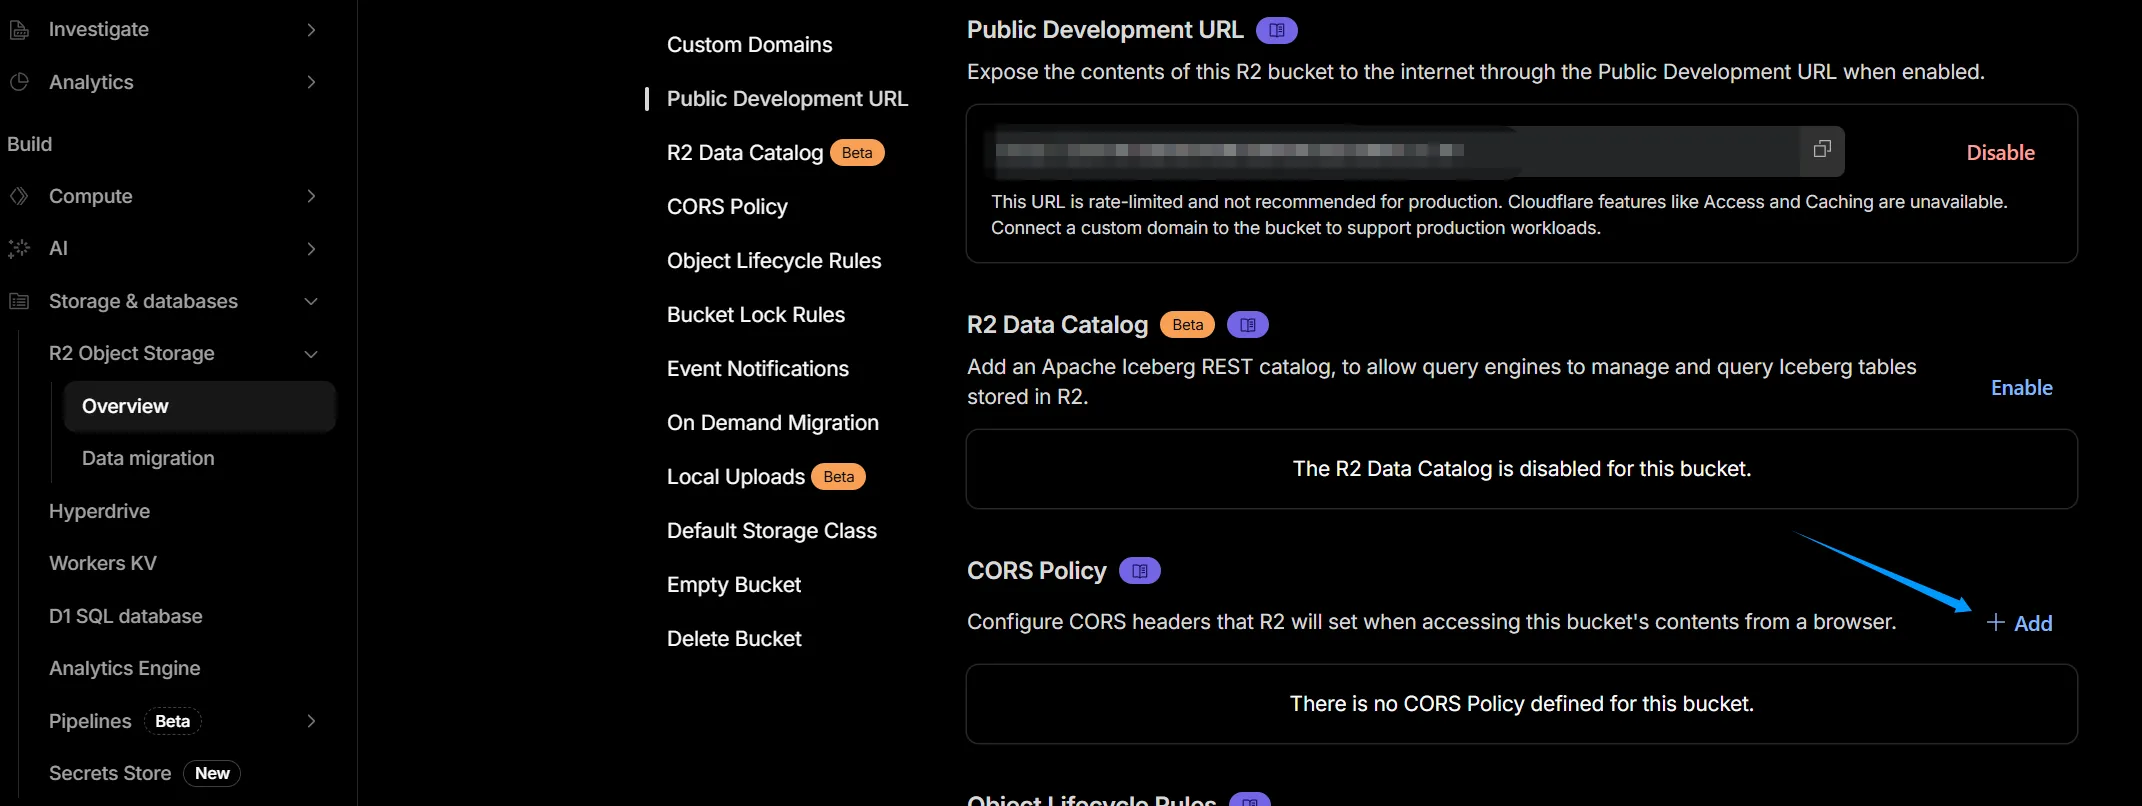 First, allow R2 to be accessed by S3 Image Port. Return to the R2 Settings page, find CORS Policy, click Add, delete all content in the pop-up code box, and replace it with:
[ { "AllowedOrigins": ["https://imageport.thok.top"], "AllowedMethods": ["GET", "PUT", "DELETE", "HEAD", "POST"], "AllowedHeaders": ["*"] }]Then click Save. This allows your R2 to accept requests from imageport.thok.top. If you use the original project’s main branch, use the code below.
[ { "AllowedOrigins": ["https://imageport.app"], "AllowedMethods": ["GET", "PUT", "DELETE", "HEAD", "POST"], "AllowedHeaders": ["*"] }]6. Create an R2 API Token
Section titled “6. Create an R2 API Token”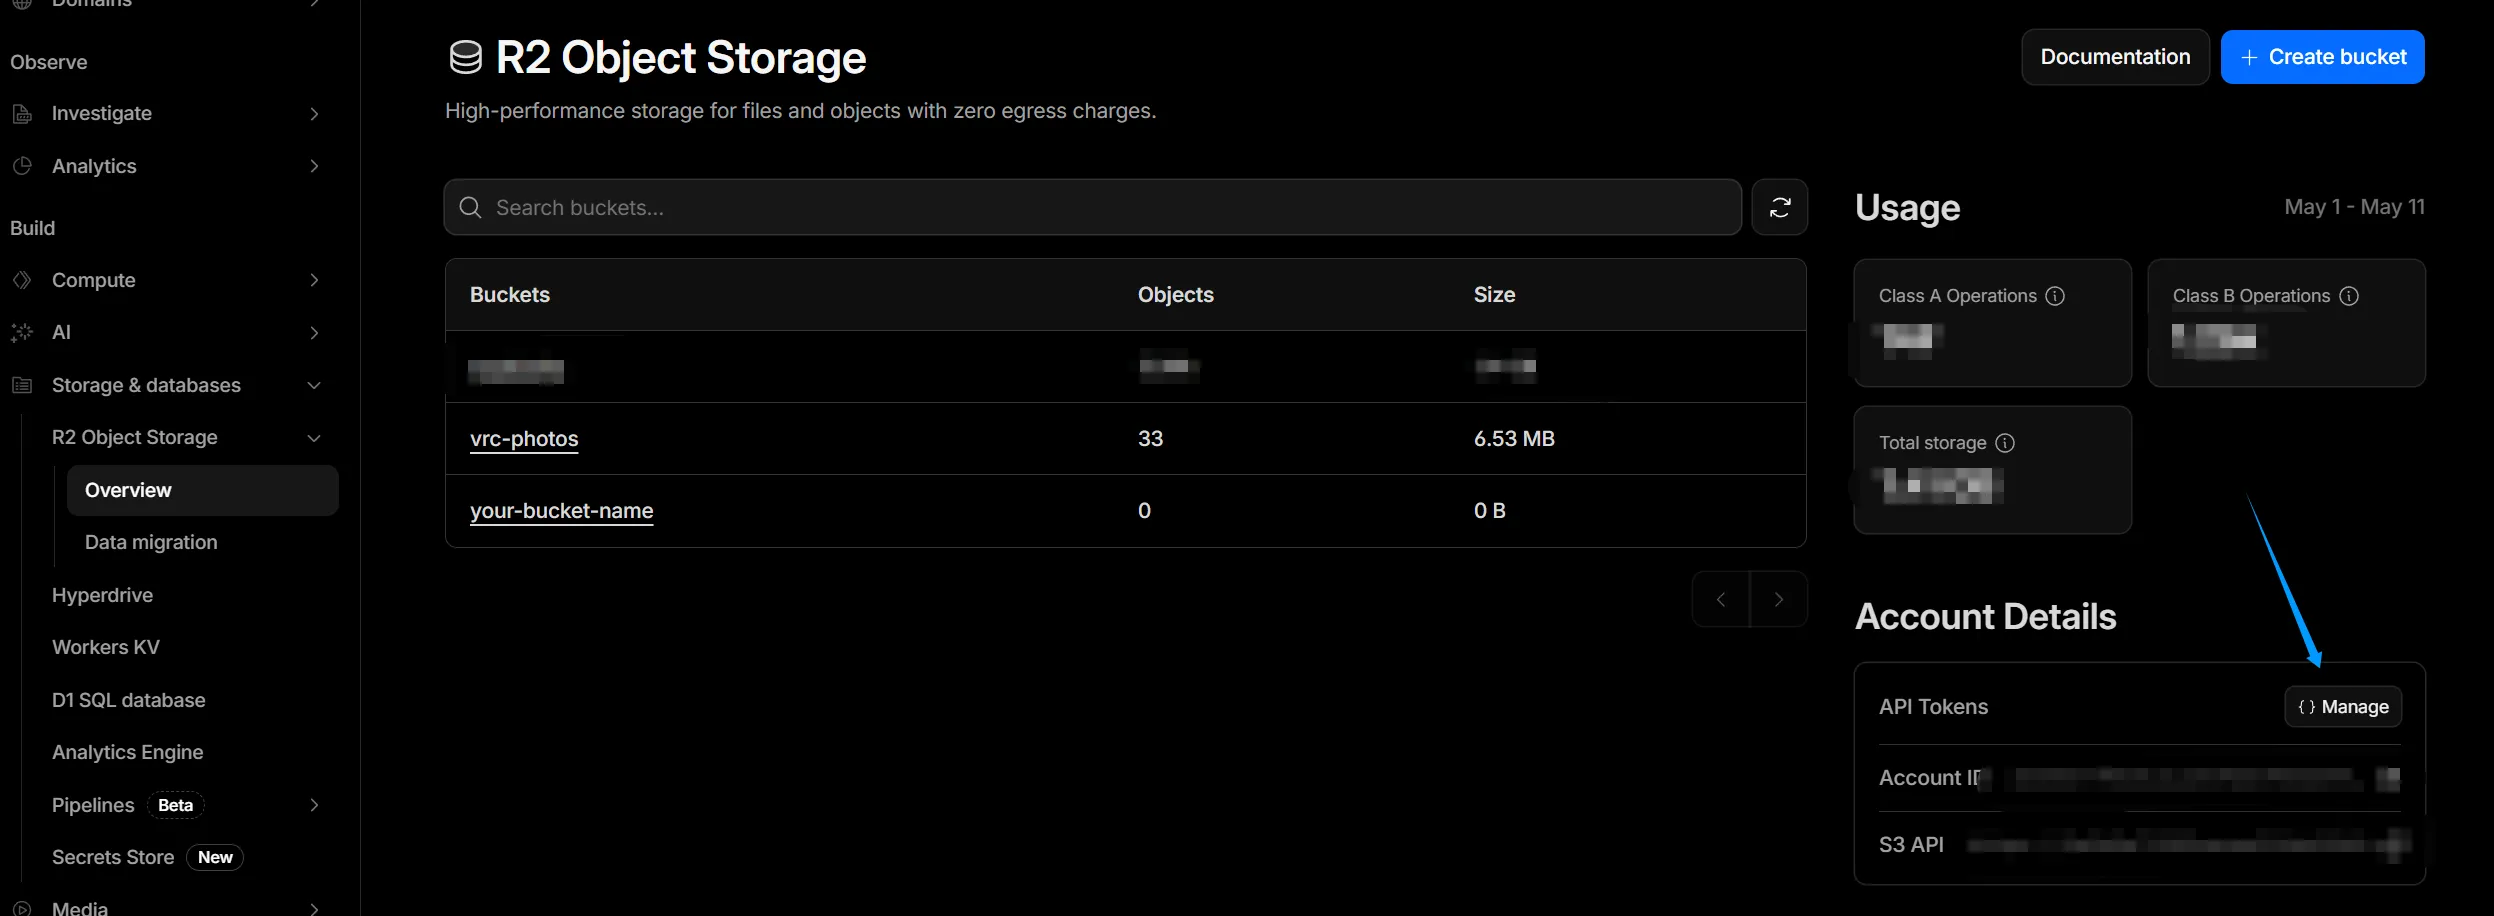 Return to R2’s Overview panel, find Account Details → API Tokens → Manage, choose Account/User token according to your needs. This case demonstrates clicking Create Account API token.
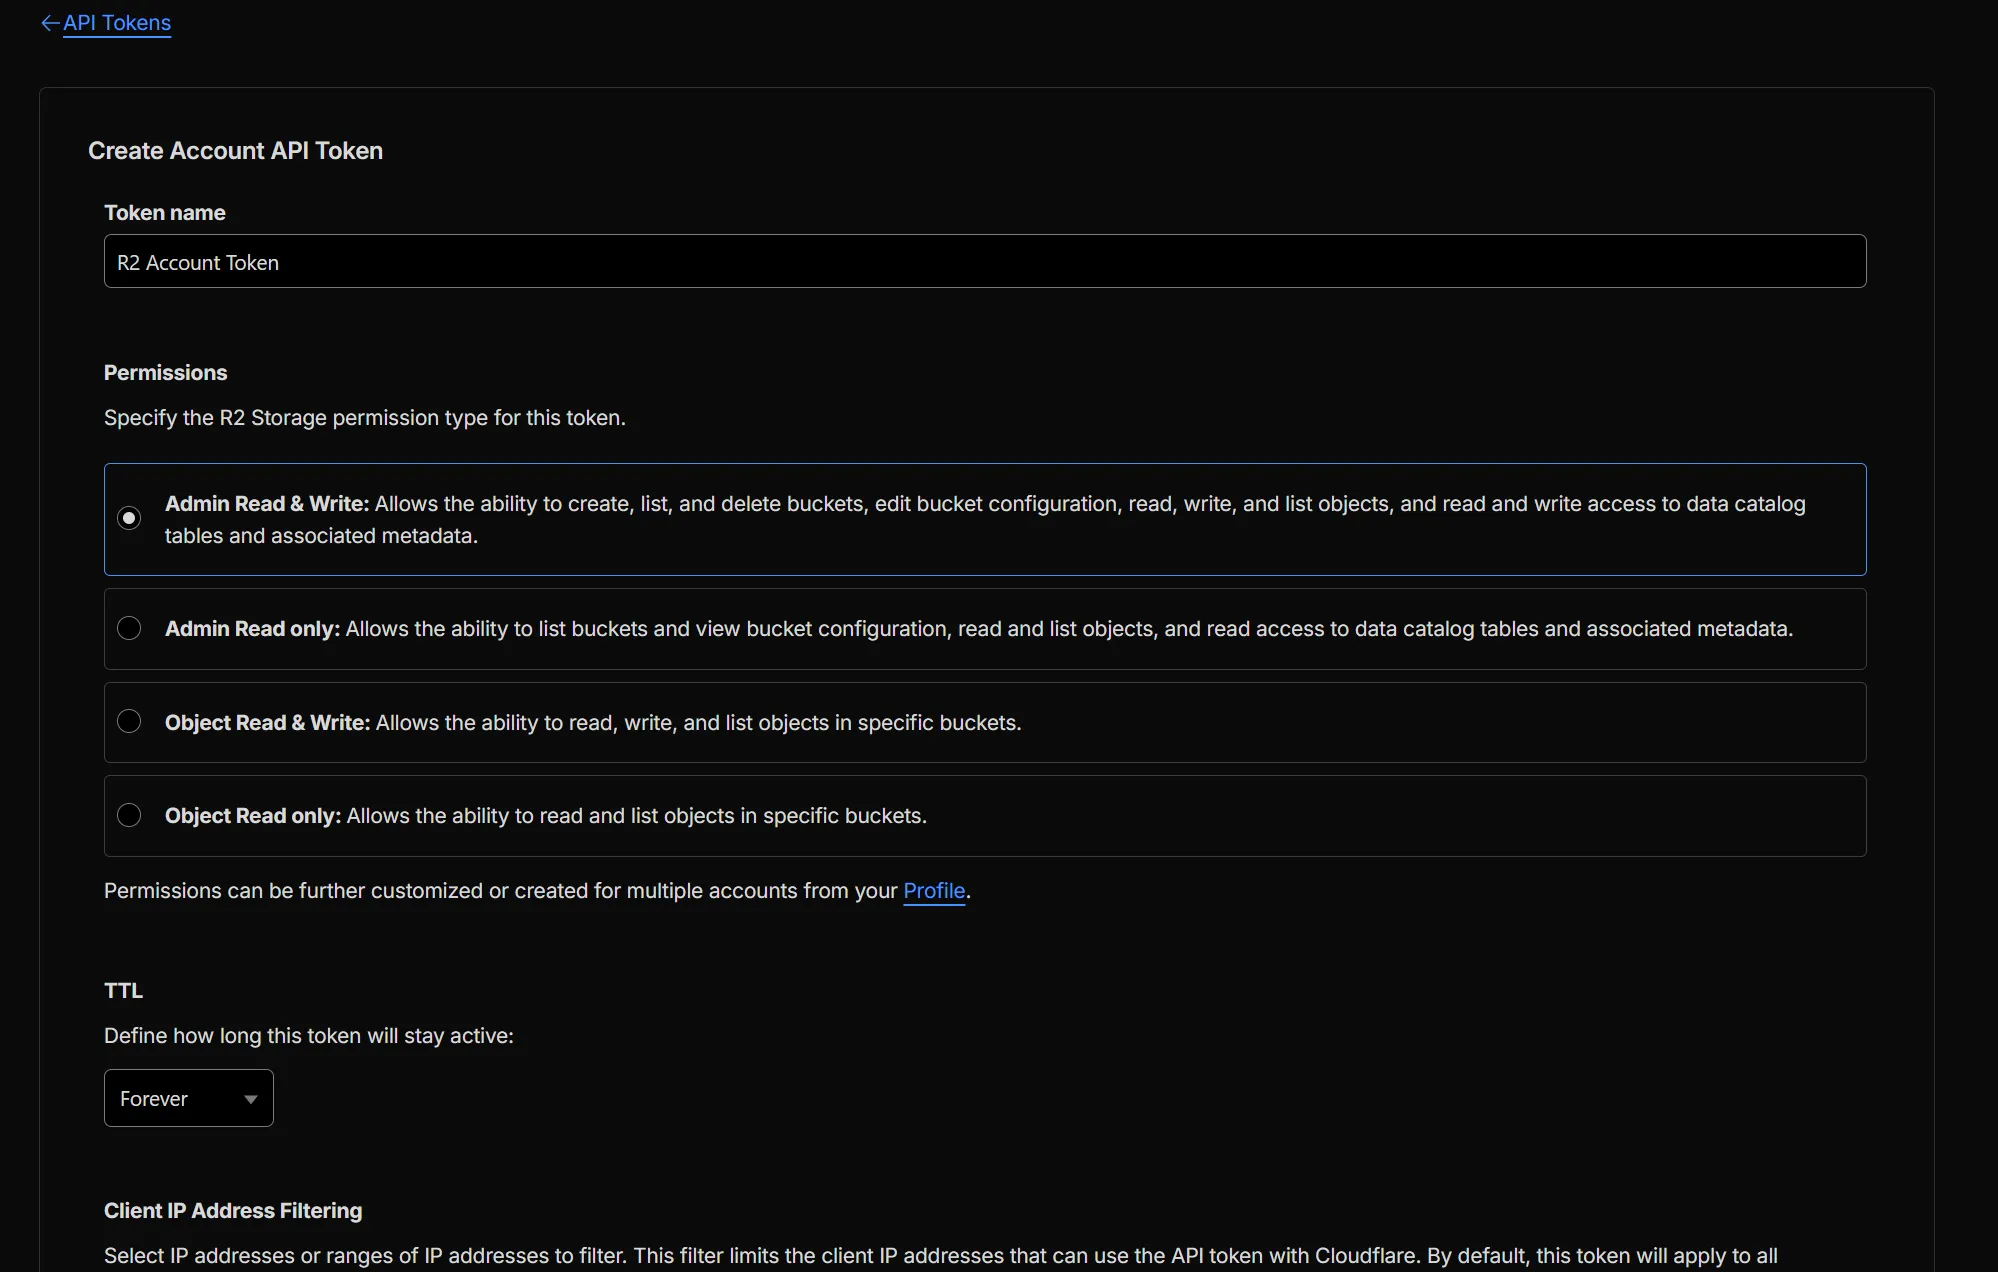 Give it a Token name. For Premissions, choose Admin Read & Write. Set TTL according to your preference. This case uses Forever. Leave Client IP Address Filtering empty, then click Create Account/User API Token
Do not close this page unless you have completed the S3 Image Port configuration or written down all Keys
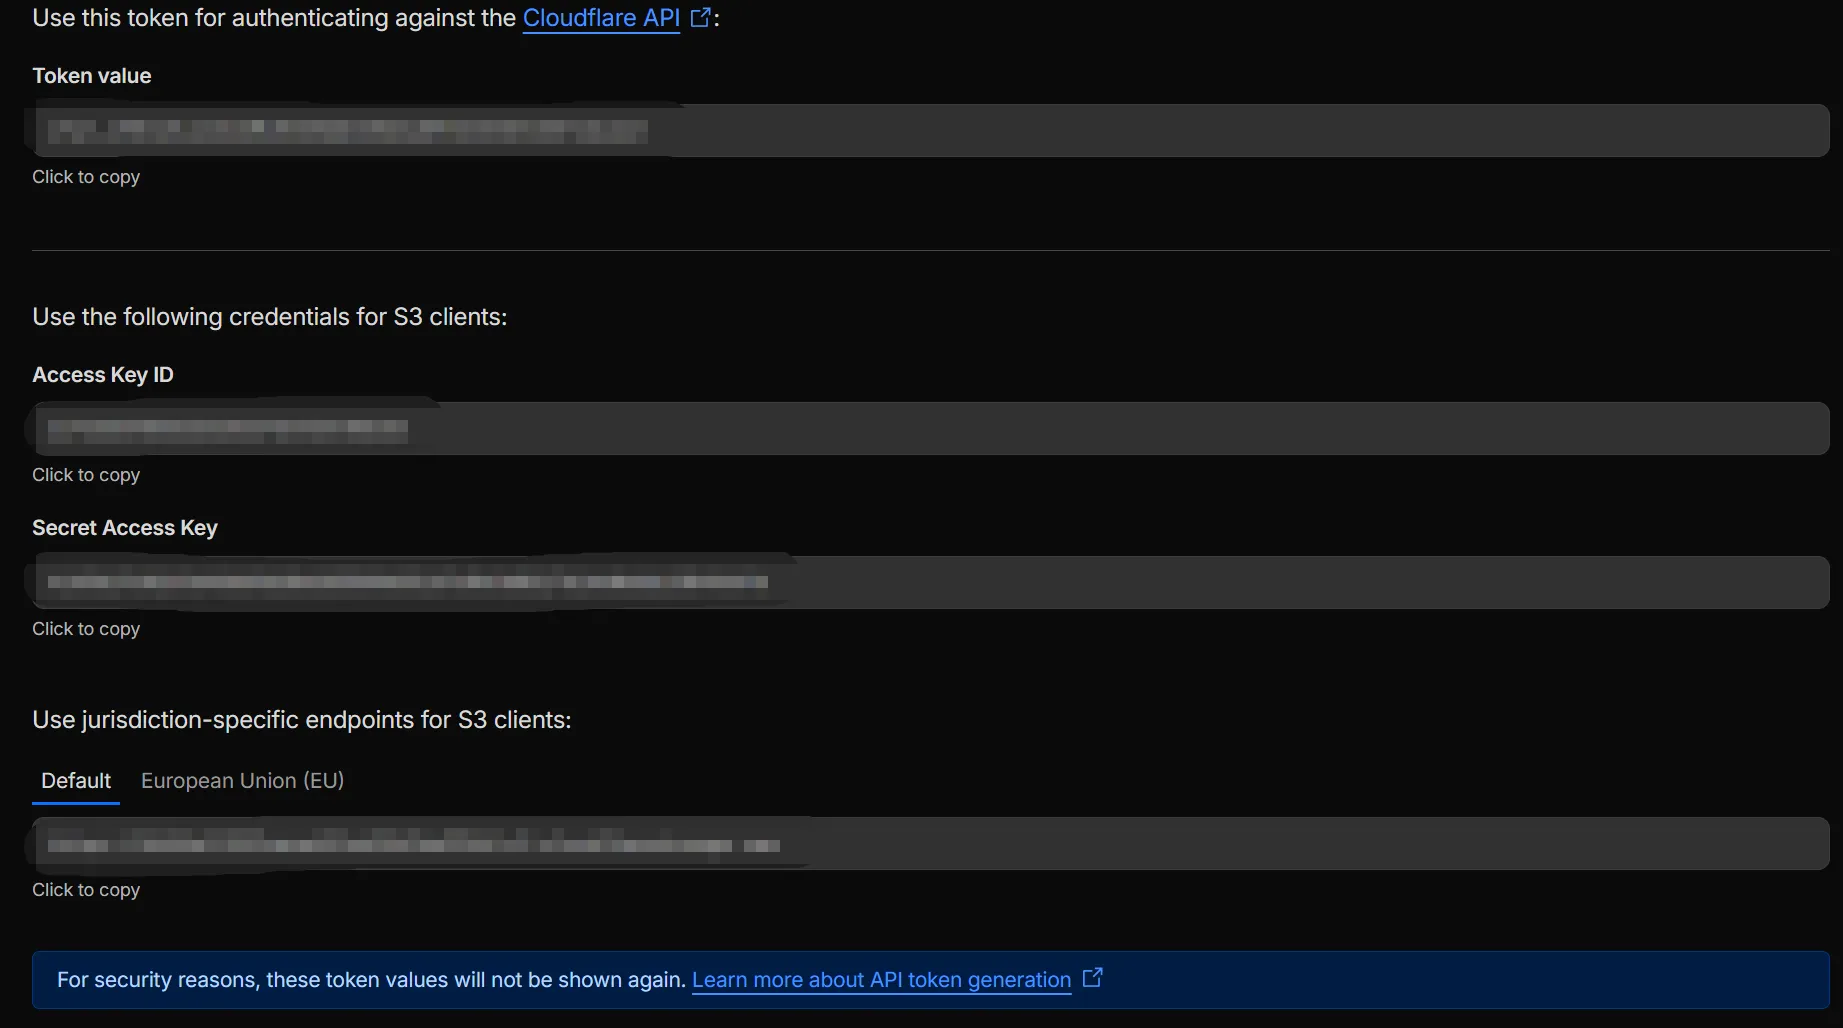
For security reasons, these token values will not be shown again. Learn more about API token generation
7. Connect S3 Image Port
Section titled “7. Connect S3 Image Port”Next, enter S3 Image Port’s Settings → S3 page
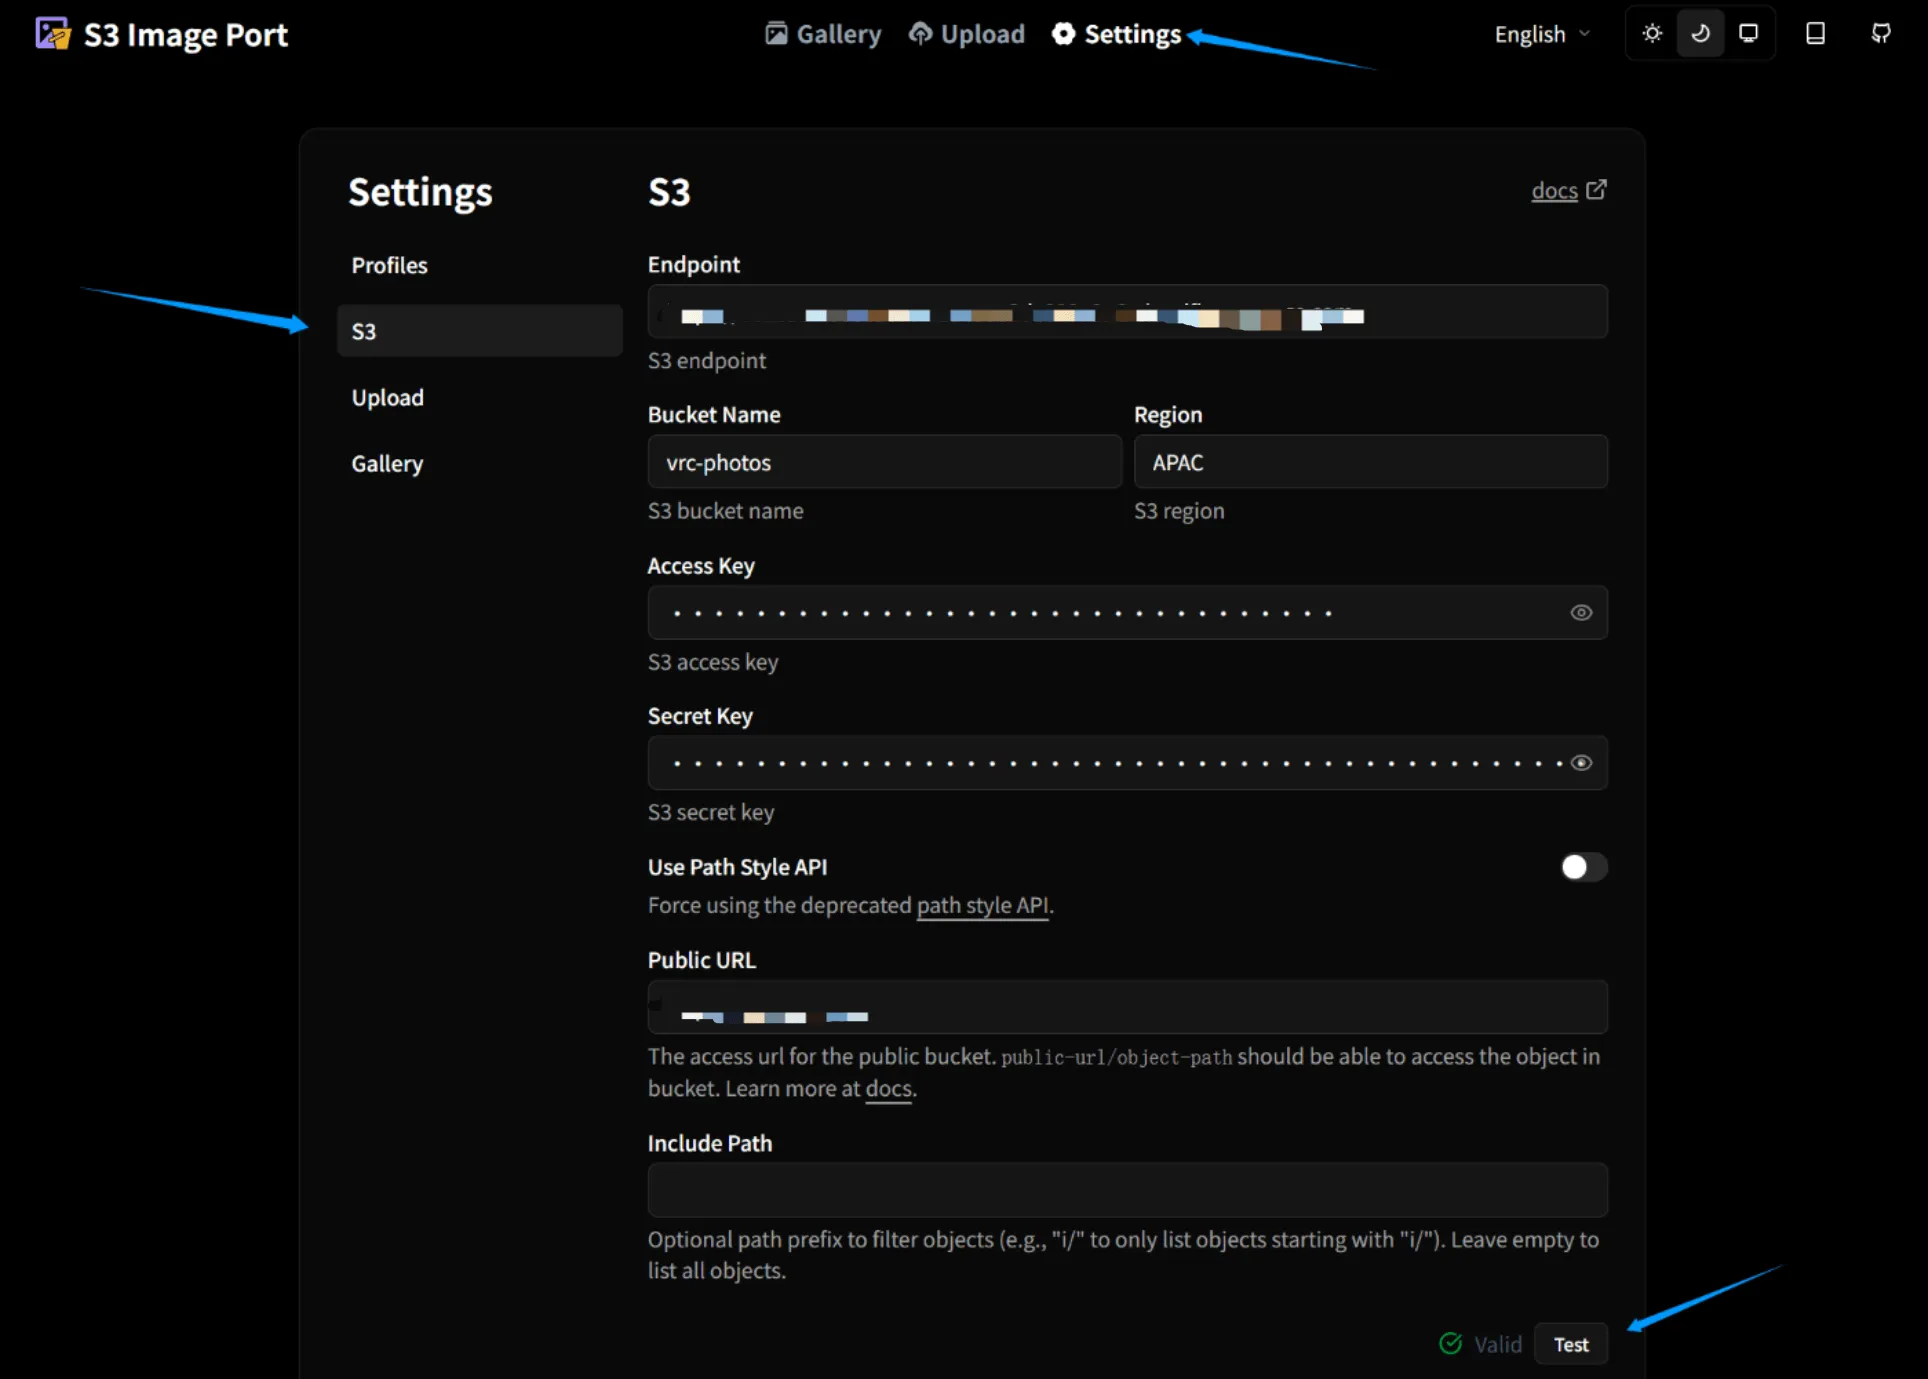
- Endpoint: Fill in the Use jurisdiction-specific endpoints for S3 clients link from the API Token page just now
- Bucket Name: your-bucket-name
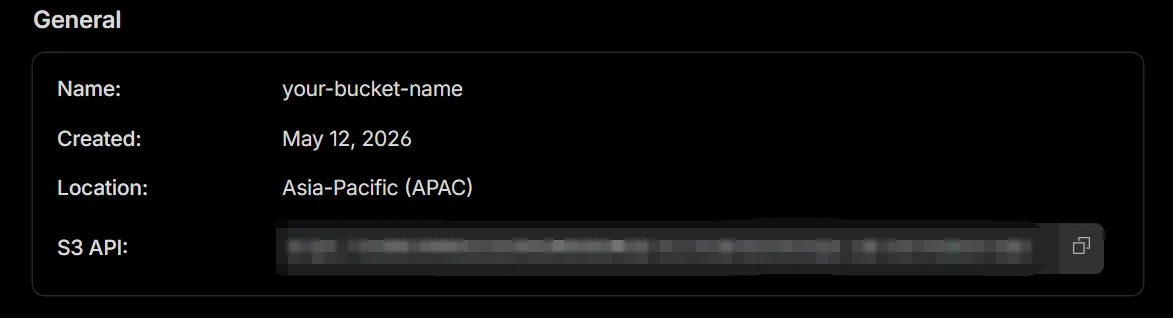
- Region: R2 Bucket → Settings → General → Location or use the default value auto
- Access Key: Access Key ID on the API Token page
- Secret Key: Secret Access Key on the API Token page
- Public URL: The Custom Domain or Public Development URL connected to R2. Note that it must start with https://
Then click the Test button. If Valid appears, the configuration is complete
S3 Image Port and R2 are finally bound
Now you can switch to the Profiles page and click Rename to give this configuration file a new name
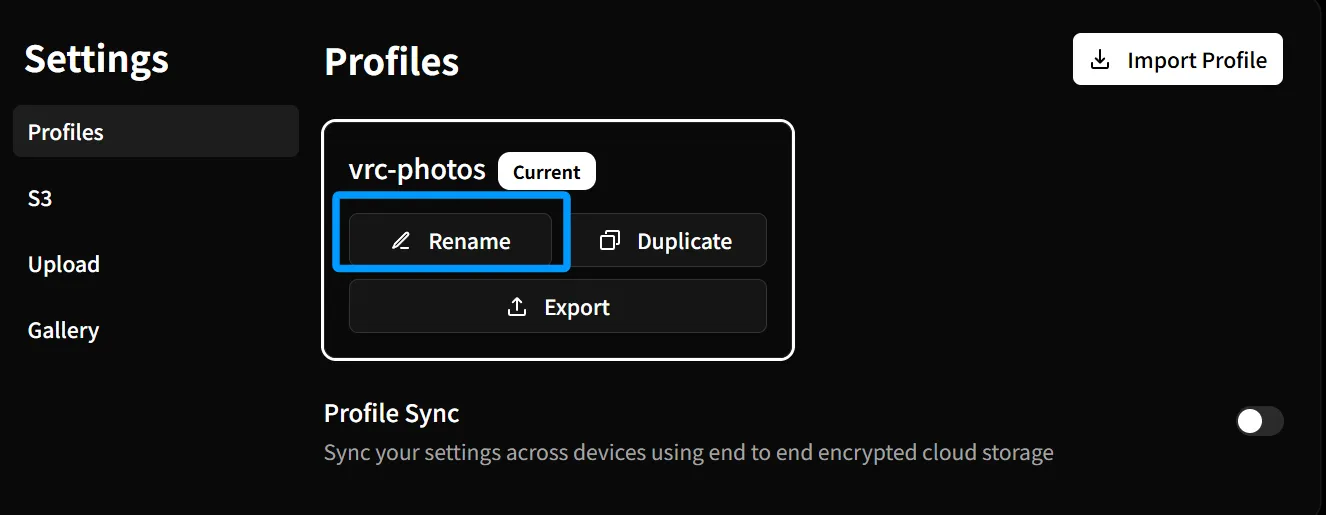
If you want to switch S3 Image Port branches or use another browser device, you do not need to repeat the binding steps above. Just click Export to export a JSON to the clipboard, save it in any document you like, and next time, just copy this JSON to the clipboard and click Import Profile in the upper-right corner of the Profiles page.
8. Upload images and copy URLs
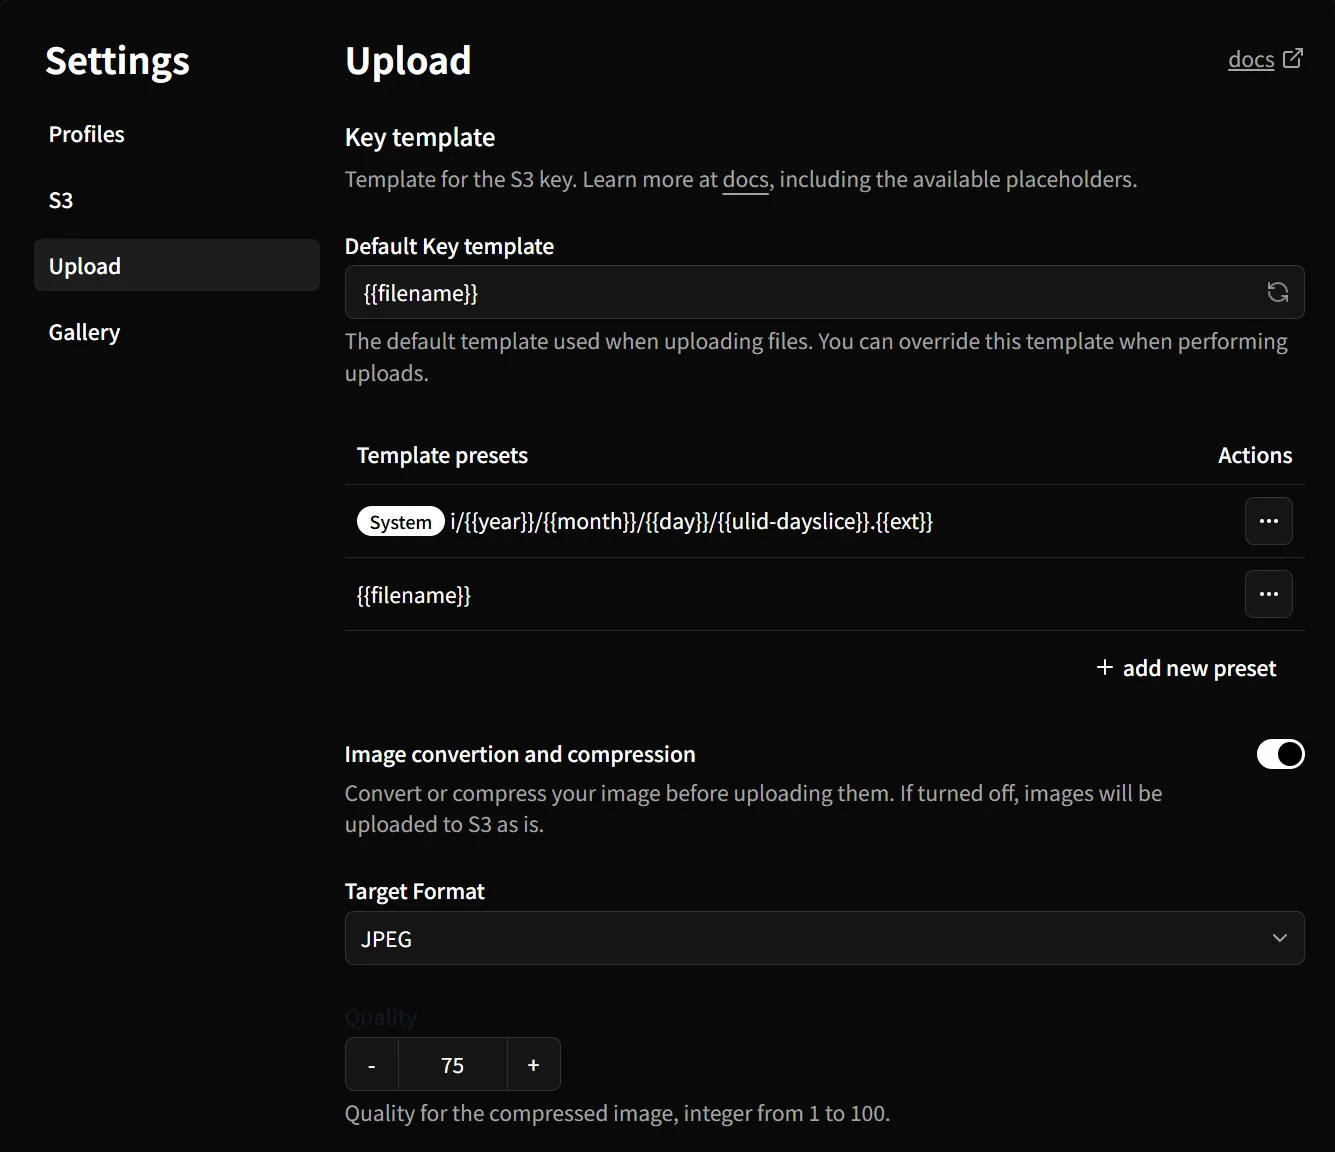
Section titled “8. Upload images and copy URLs”The Settings Upload page defines some behaviors when uploading images. My Default Key template only fills in {{filename}}, which means the default naming template for uploaded images only contains the file name. In other words, the image name after upload is the same as the local image name. The explanation is a bit wordy, but if you upload a few images and look at the paths, you will understand it. The docs link above explains how each Key is used
Image convertion and compression can convert formats and compress images. For network image transmission needs (VRC RemotePhotoSystem), it is recommended to use JPEG format and compression
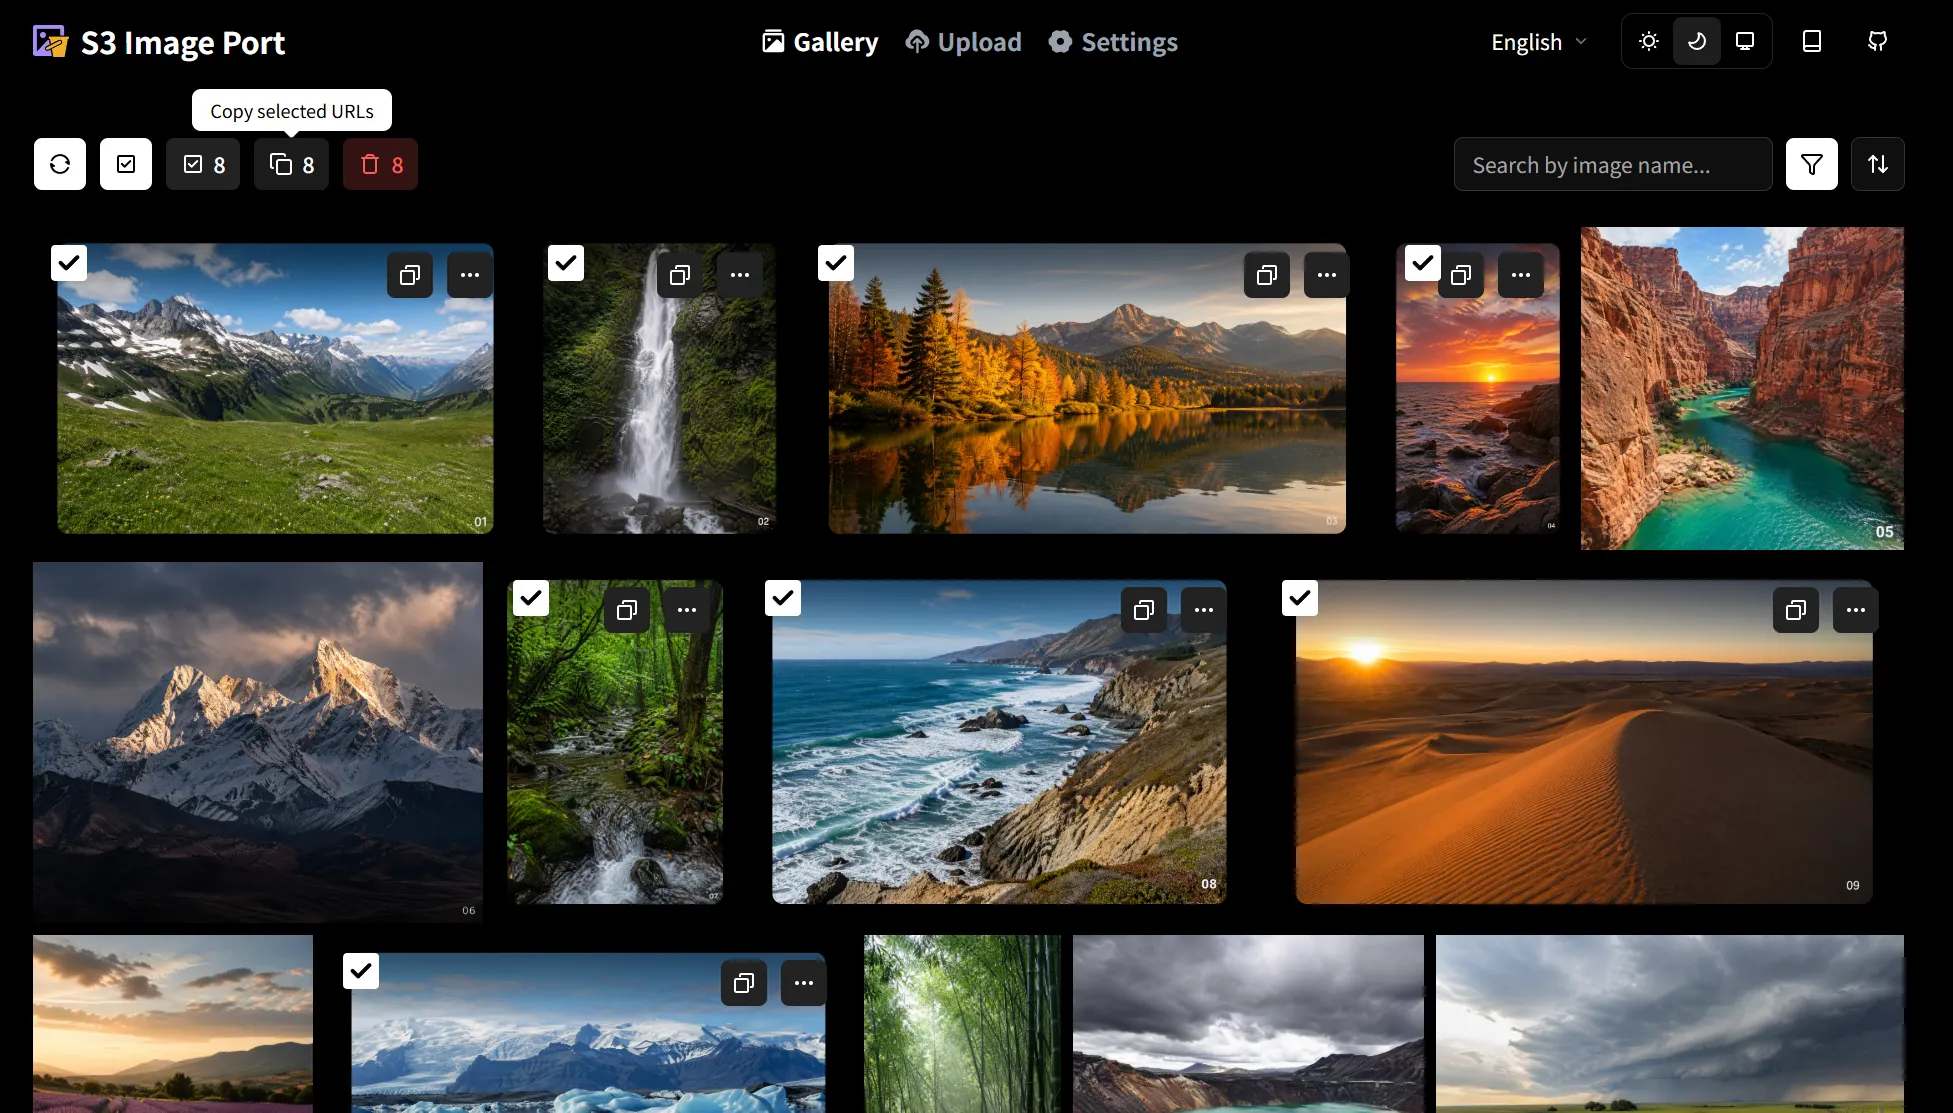
Click Upload in the navigation, upload a few images, go back to Gallery and refresh a bit, and you should be able to see your images in R2 in front of you.
Next, you can operate by intuition. There is a select all button in the upper-left corner. After selecting images, cancel all selection, copy selected URLs, and delete selected images will appear (this will delete images in the R2 Bucket). In the lower-left corner, you can switch each page to show 20, 50, or 100 images. Double-click an image to enter single-image view.
The select all + copy selected URLs feature allows you to quickly connect with RemotePhotoSystemWebtool, and this is why we use it.